

Support
Frequently Asked Questions
- XPEDO Smart Trainer has been 100% calibrated in the factory side and it does not need Spin down .
- XPEDO Smart Trainer is capable of wireless communication via ANT+and Bluetooth 4.1 protocols. As long as the software conforms to Bluetooth4.1 and ANT+, communication protocol can be used. (EX: Zwift, ROUVY, Kinomap…) Officially recommened APP: WhiizU, is able to do firmware update and support iOS, Android and Windows PC.
Please refer to the official website of WhiizU for details of the system version requirements. For other related software requirements, please refer to the software compatibility table.
- When the trainer is powered on and not connected to the app for simulation, you can manually adjust three level of resistances by pressing
the power button. Three levels of resistance are simulated flat ground/hills/mountain roads.
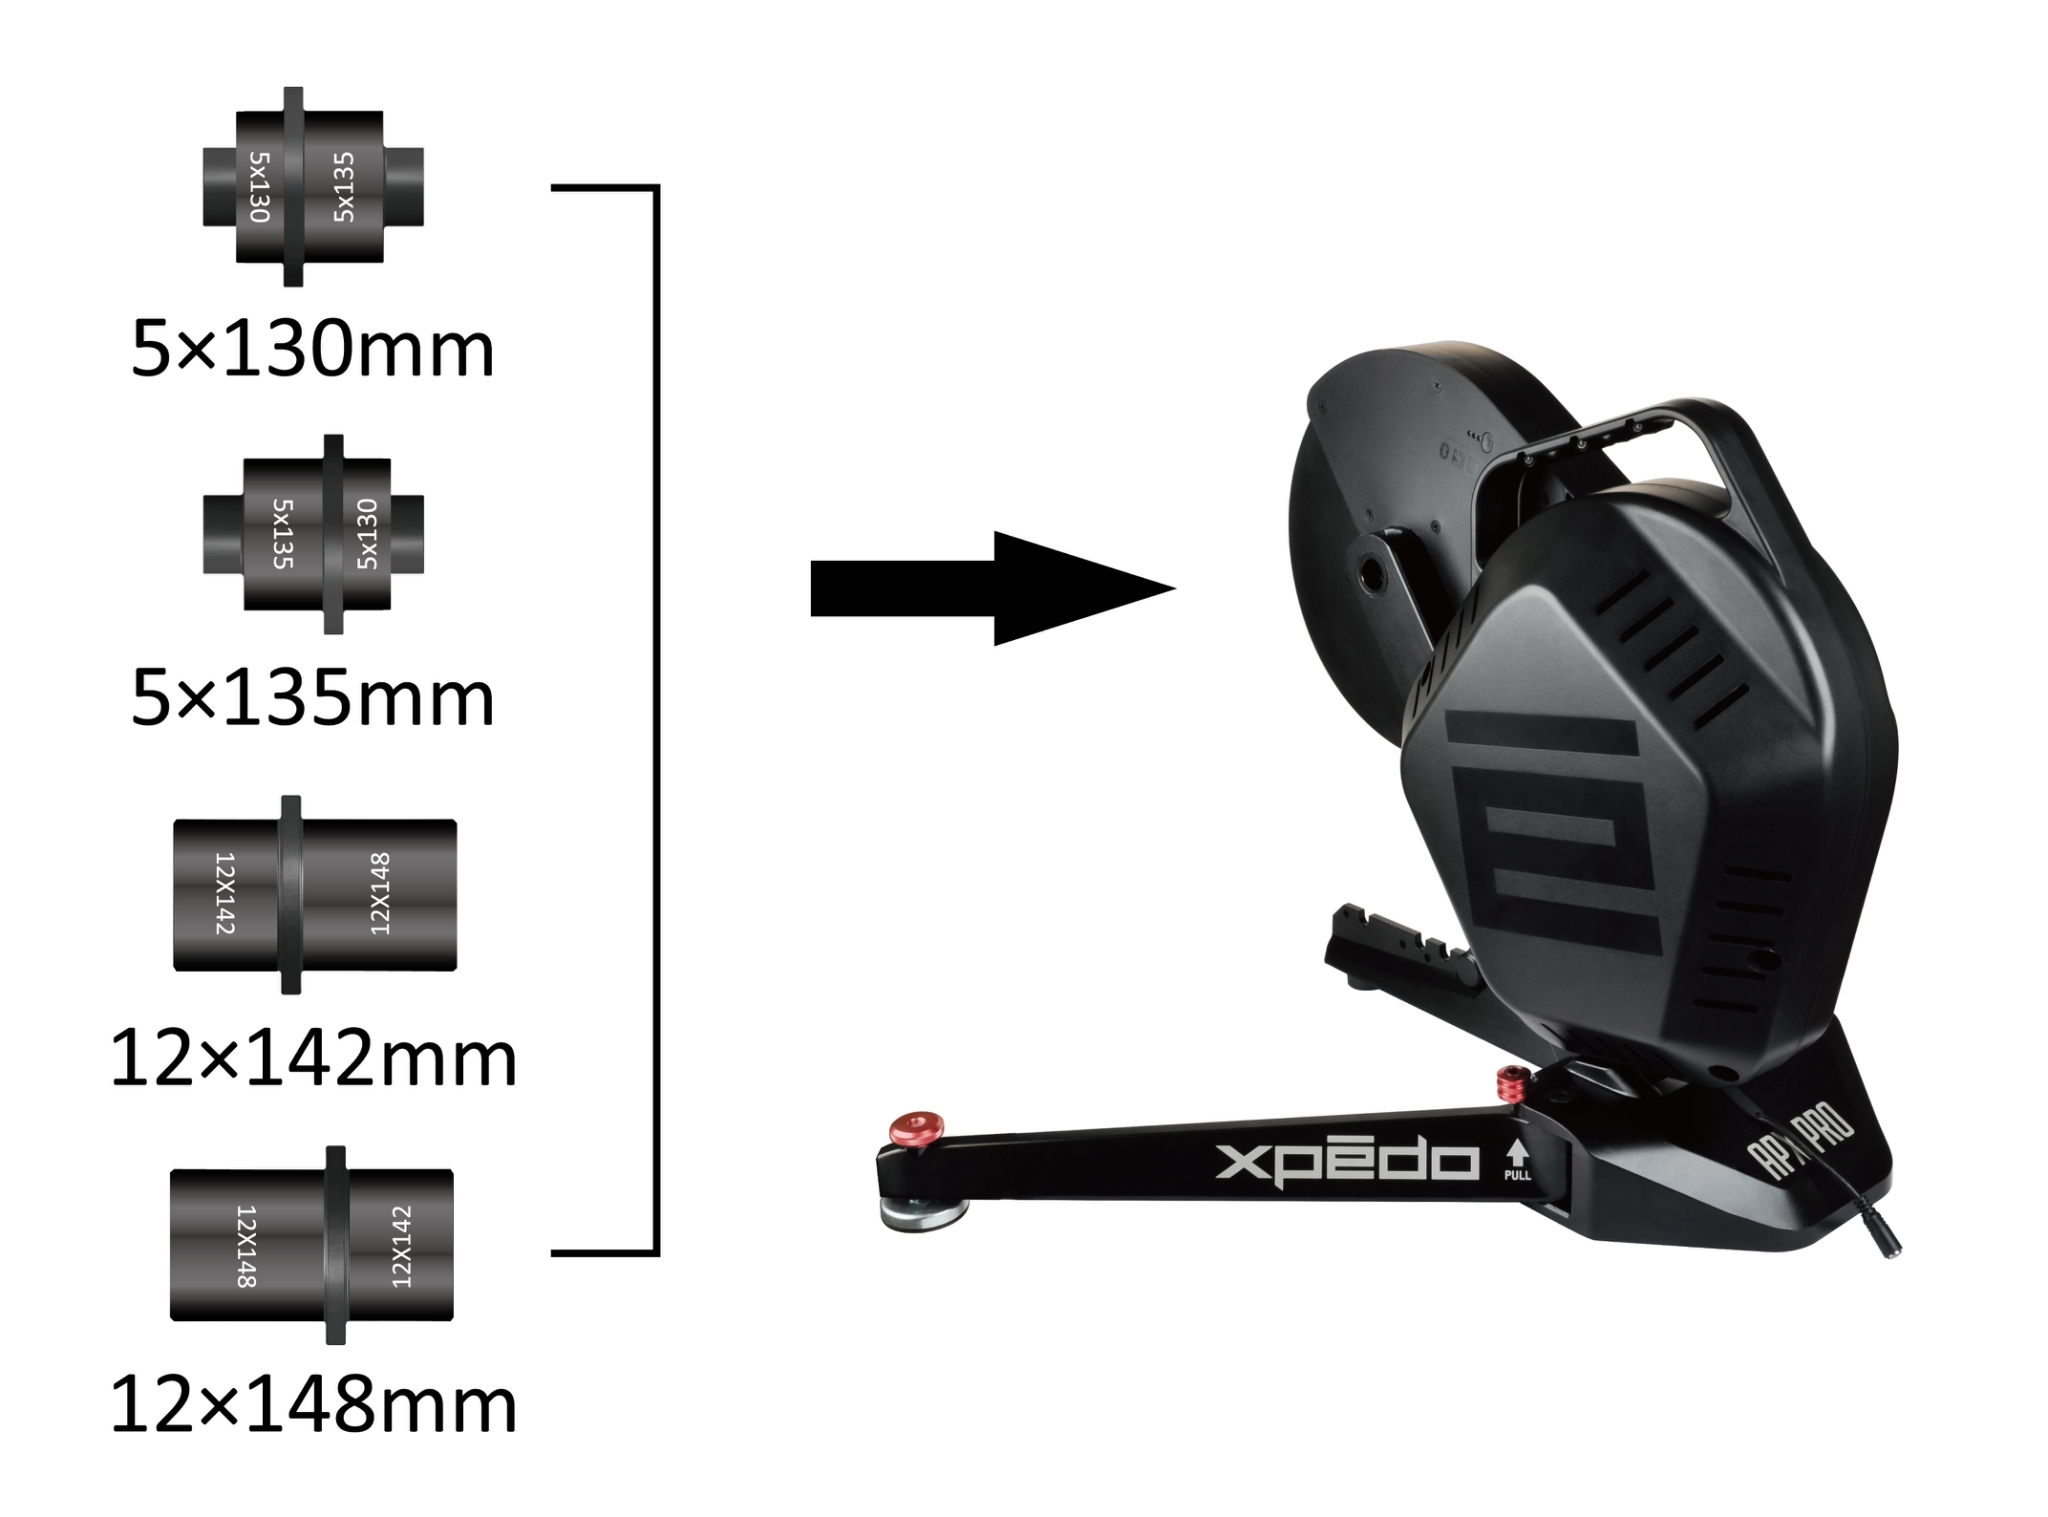
- It can support Shimano 9-12 speed/Sram 9-11 speed cassette. SRAM XD, XDR; CAMPY series need to purchase additional casstte body
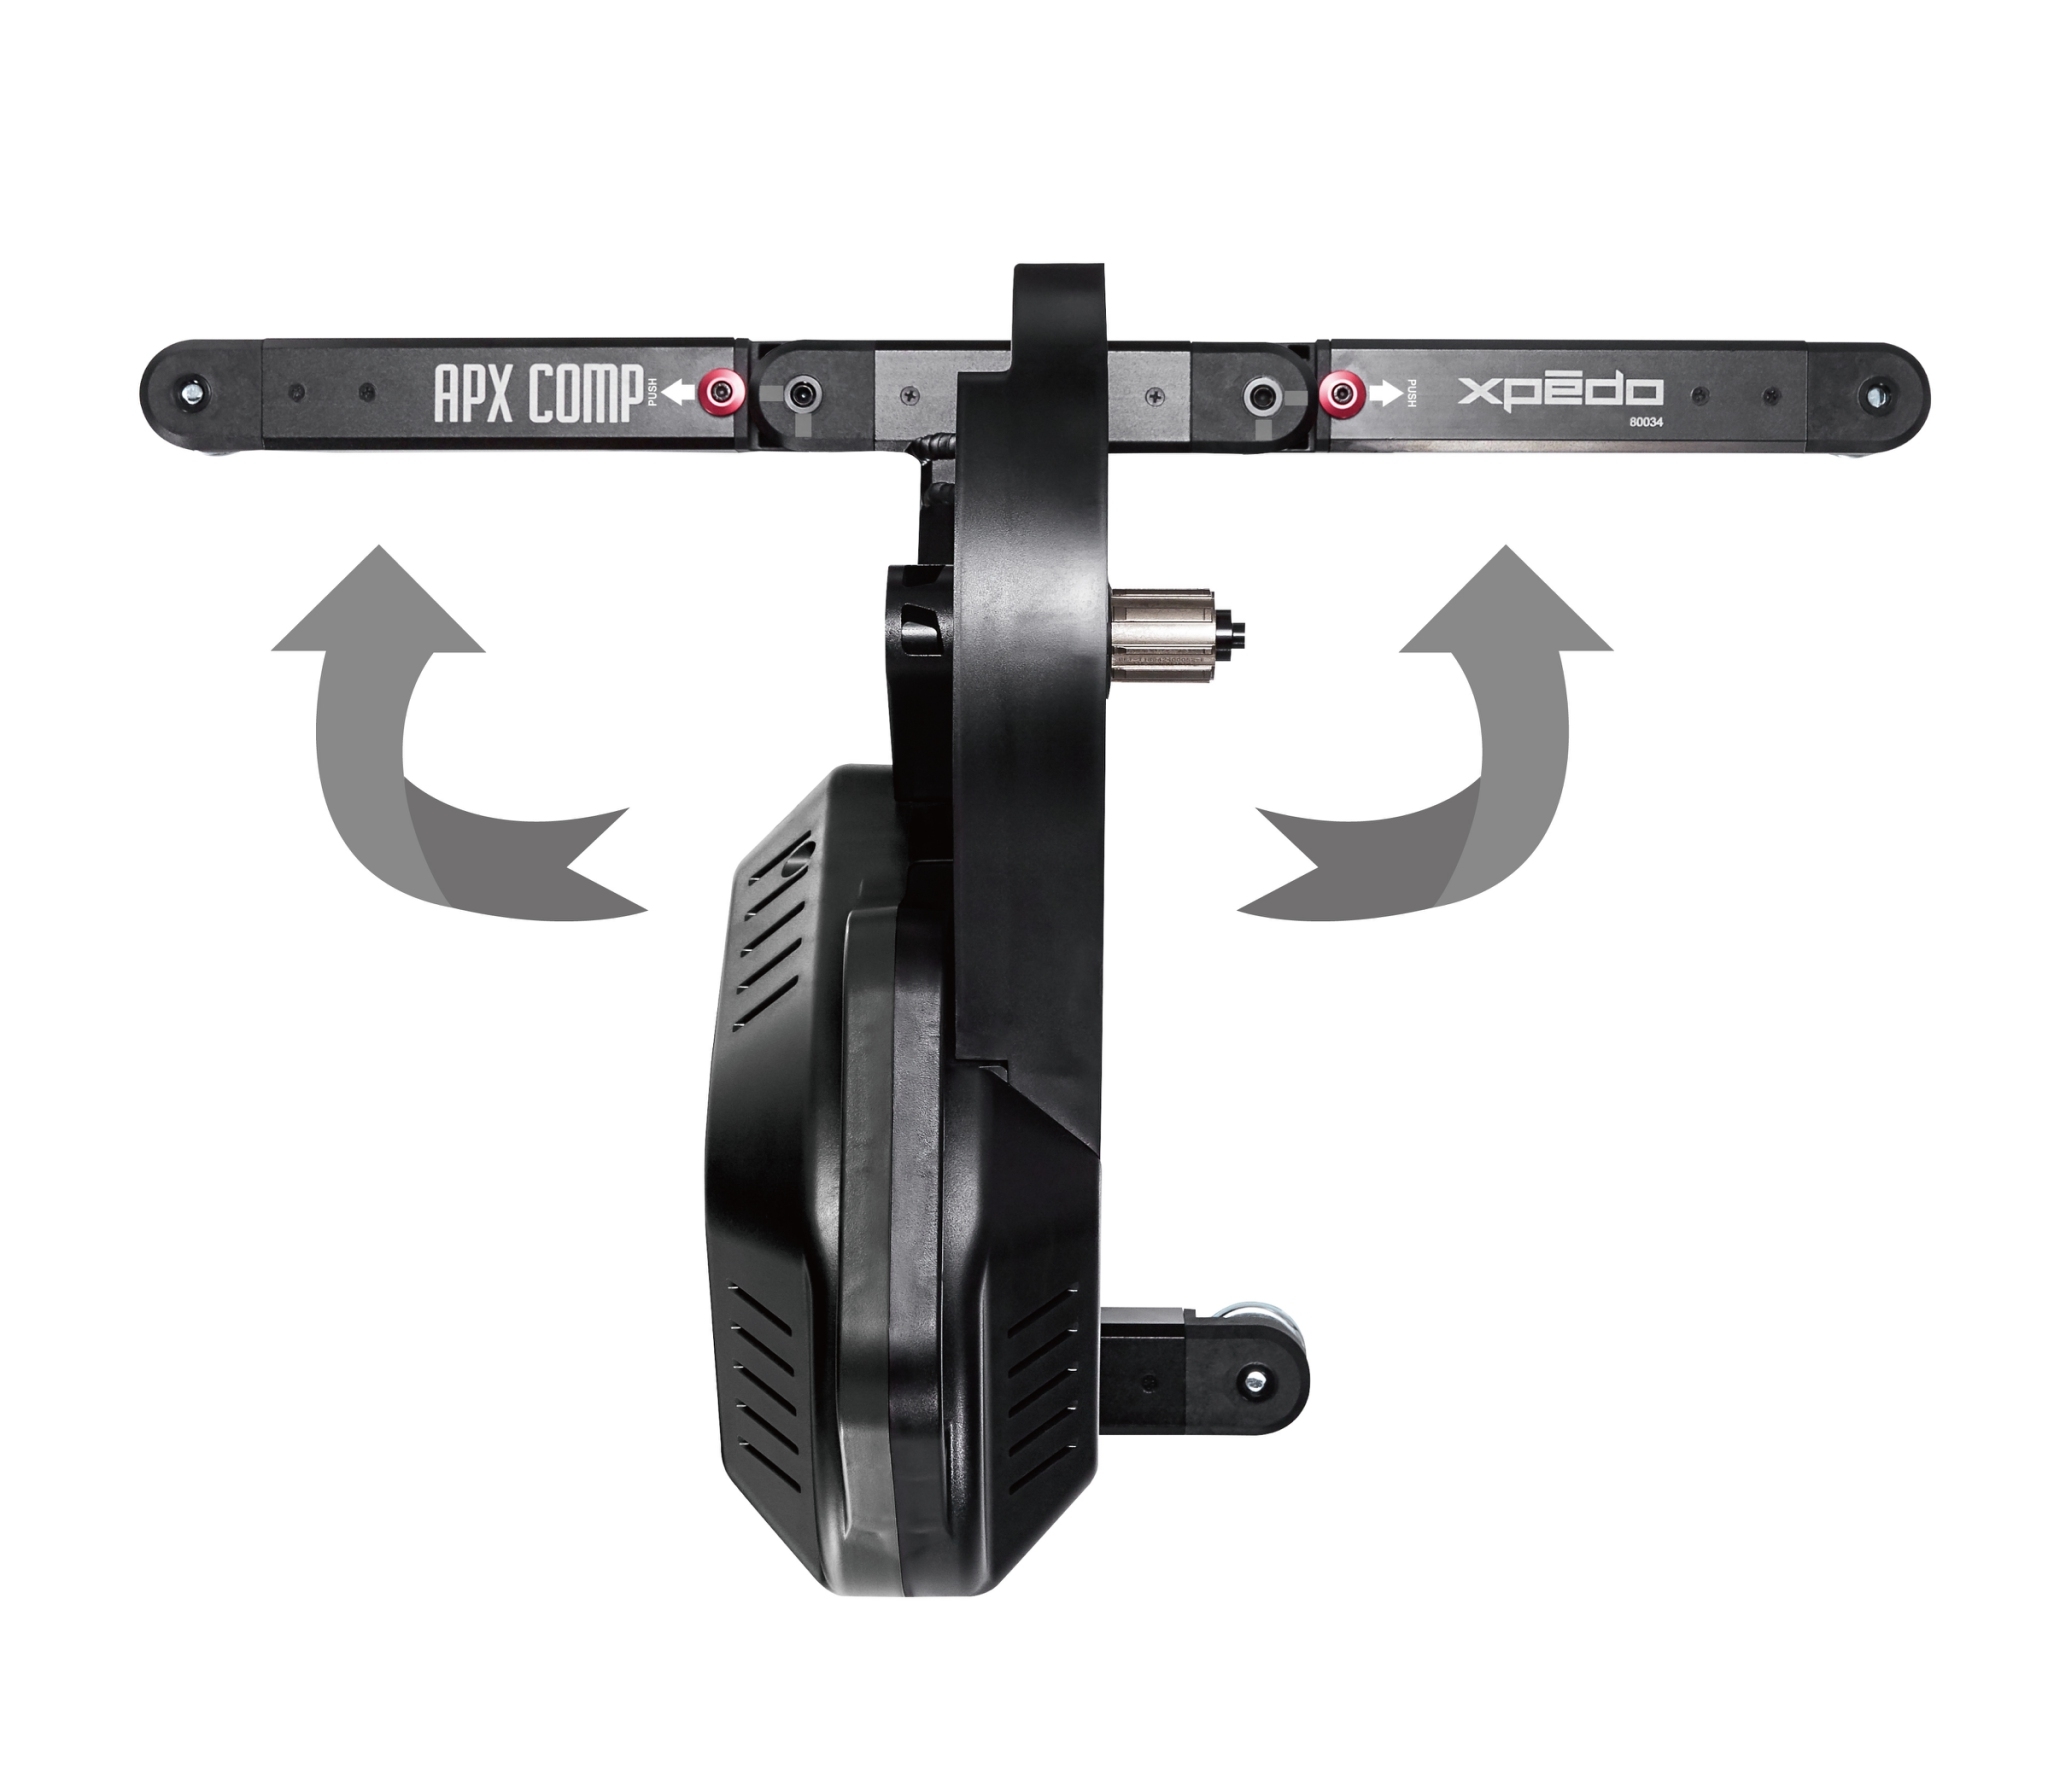
- Yes, APX PRO and APX COMP can support long legs and enlarged guide wheels.
- XPEDO Smart Trainer is not waterproof. Keep the trainer dry. DO NOT use it in a humid environment.
- Wipe the Smart Trainer off with a dry cloth after riding to remove any sweat from use.
- Turn off power while cleaning. Only use a dry cloth for cleaning. DO NOT use detergent or cleaning powder.
- Unplug the power cord after each use. Store the power cord properly to avoid danger.
- To store the XPEDO Smart Trainer indoors when it is not in use for a long time. Please keep the trainer dry and avoid exposure to direct sunlight. Keep the trainer away from the fire, water and other dangerous materials.
- XPEDO Smart Trainer is not equipped with the mechanical structure adjusted by the user. DO NOT disassemble the trainer. User disassembly will void warranty. If there is any malfinction, please contact an XPEDO authorized dealer for assistance.
- XPEDO Smart Trainer is warrantied to be free from defects in materials or workmanship for one year from the date of purchase. Whithin this period, XPEDO will, at its discretion, repair or replace any components that fail with normal use.
- Repairs or replacement will be made at no charge to the customer for parts or labor. Customer shall be responsible for any necessary shipping costs to the warranty center.
- Warranty Claim Requirements:
- To obtain warranty service, you must have original sales receipt and RMA.
- Items returned without a sales receipt will assume that the warranty begins on the date of manufacture.
*XPEDO reserves the right to design, change specifications and improve quality.
(If you have any questions about using XPEDO Smart Trainer, please contact your nearest XPEDO authorized dealer for assistance.)
- The XPEDO Smart Trainer have a weight limit of 286 lbs. (including bicycle)
Trainer Setup - APX PRO
Confirm bicycle specification and the type of rear wheel hub and width before using the trainer.
- Place the APX PRO Smart Trainer on the stable solid ground.
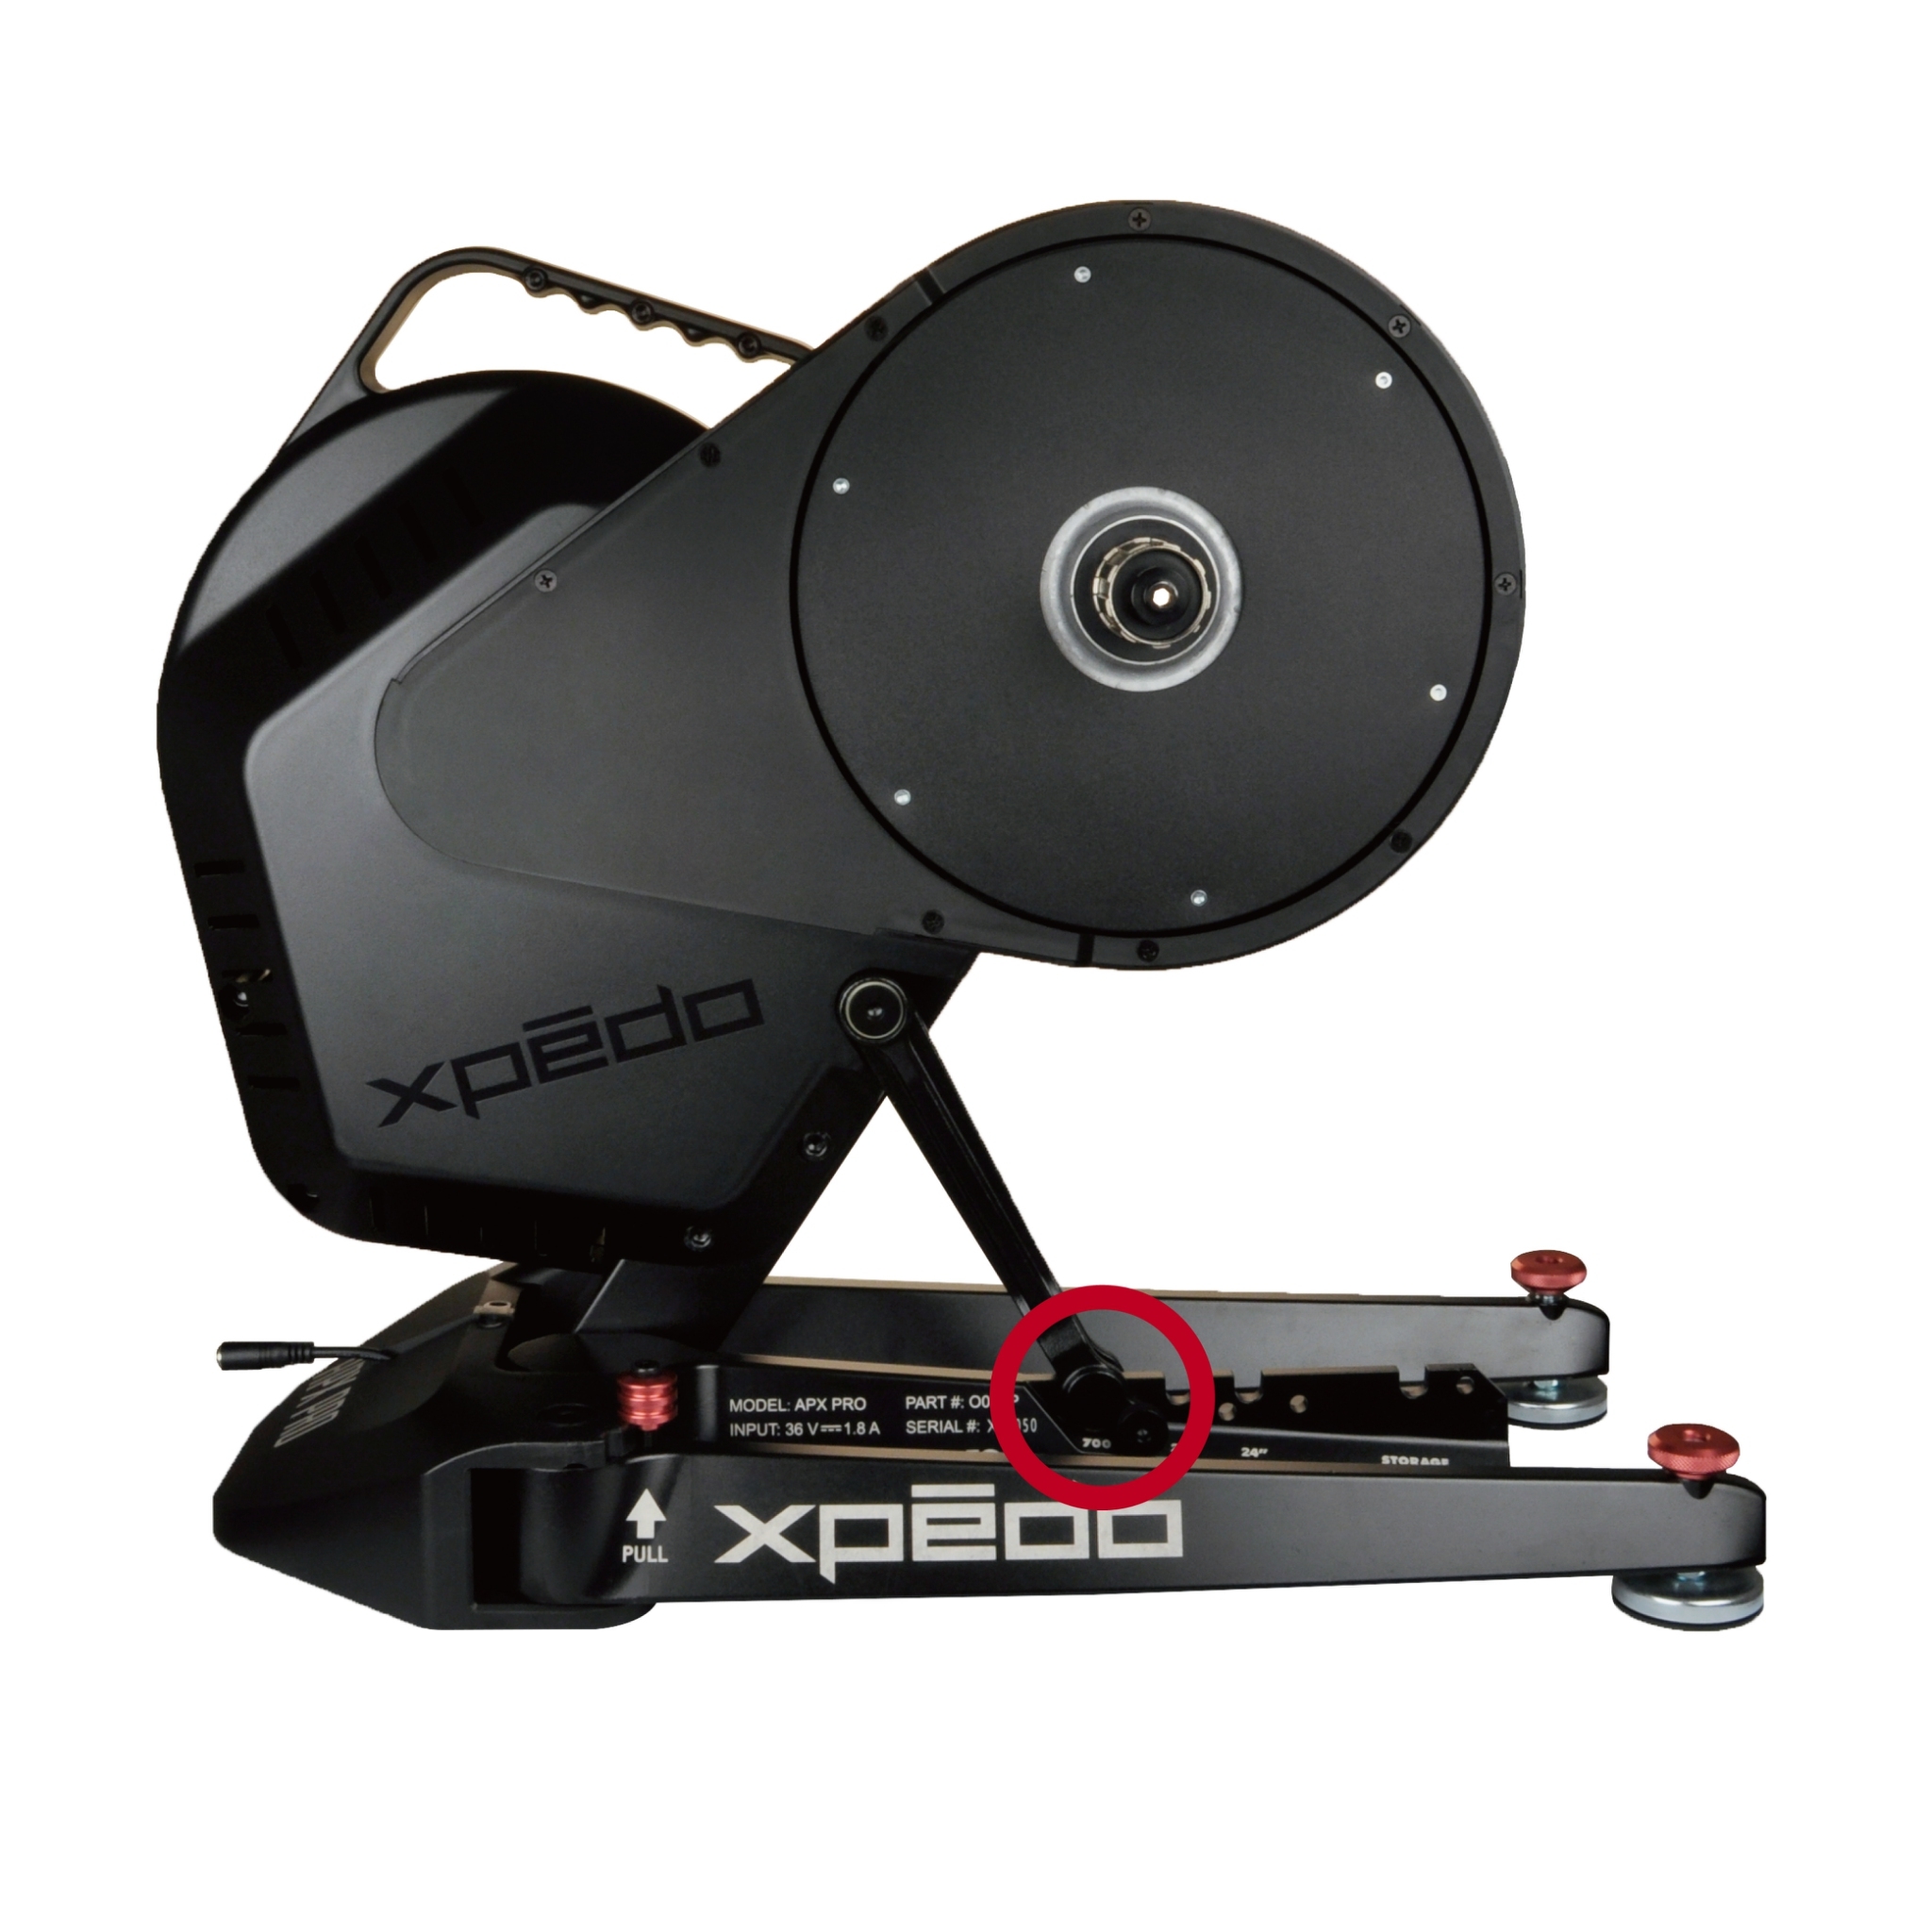
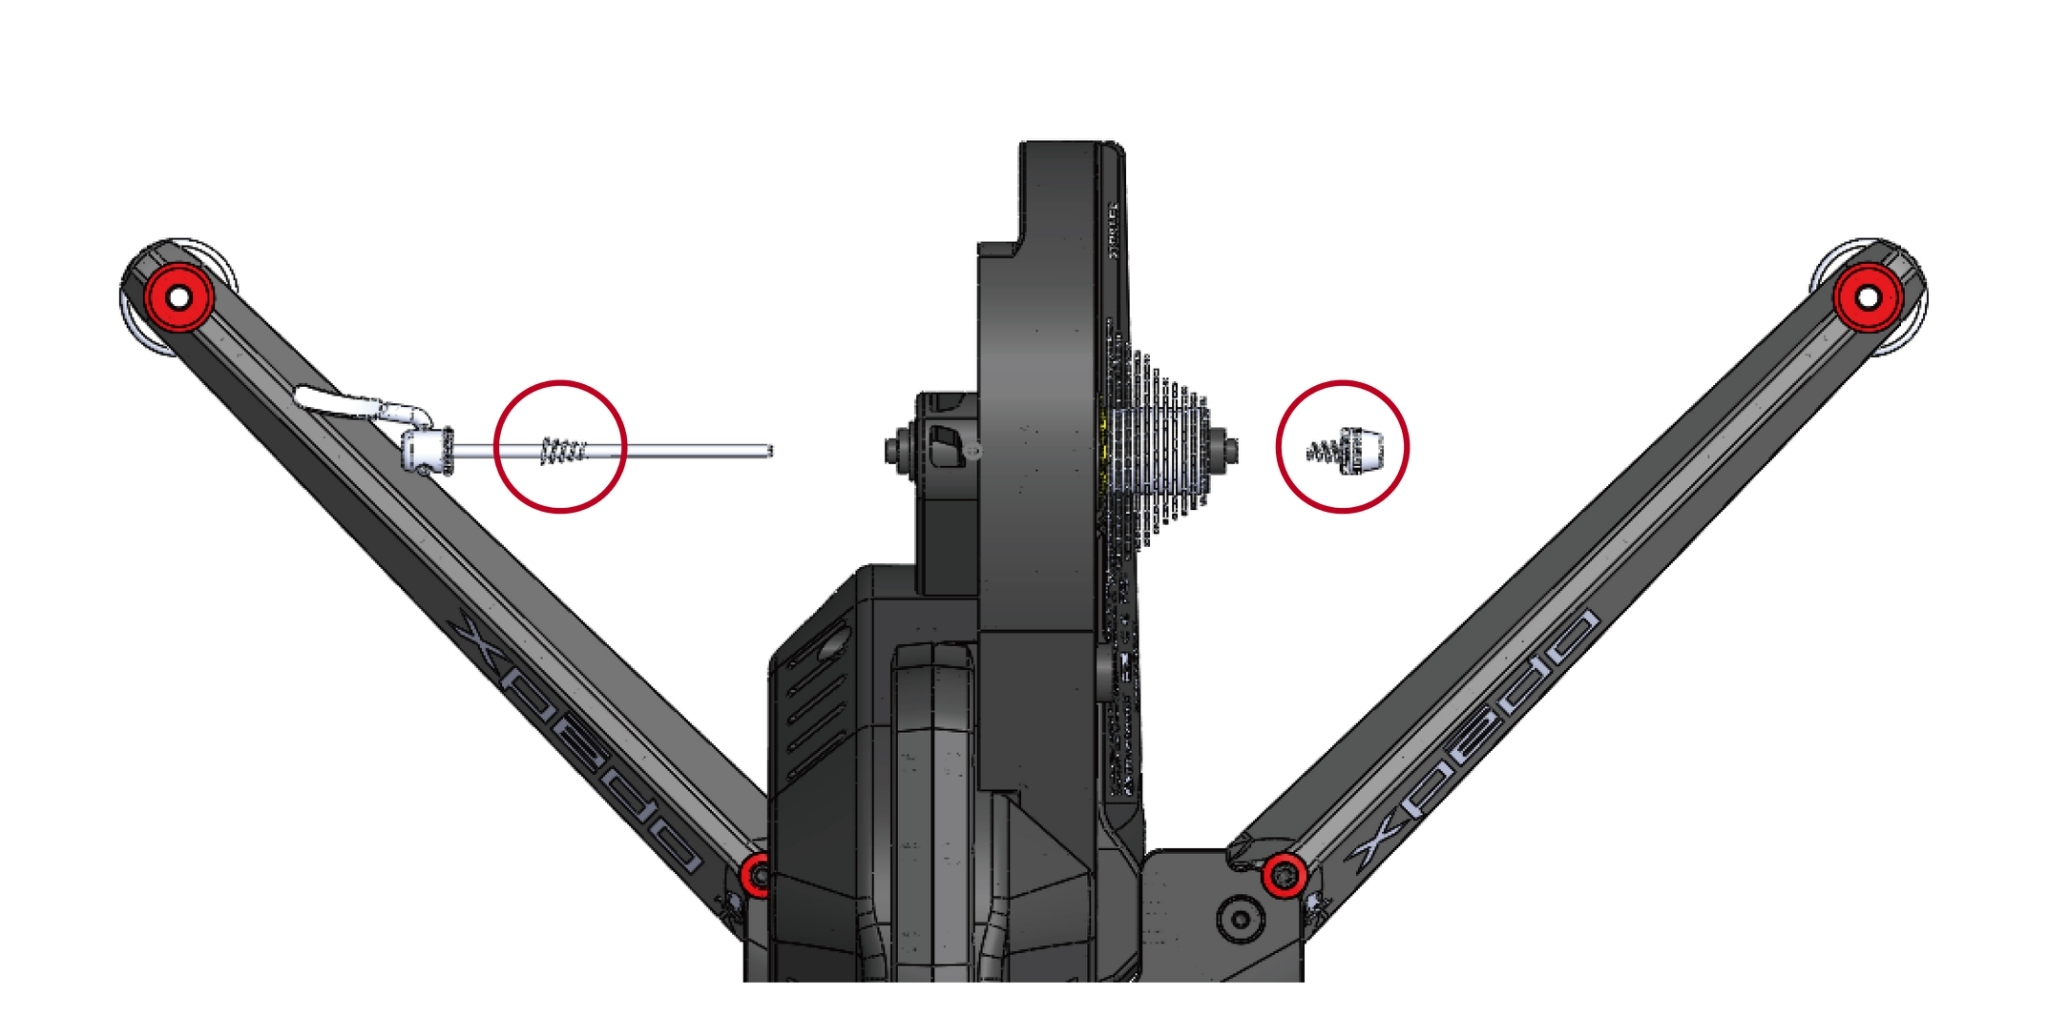
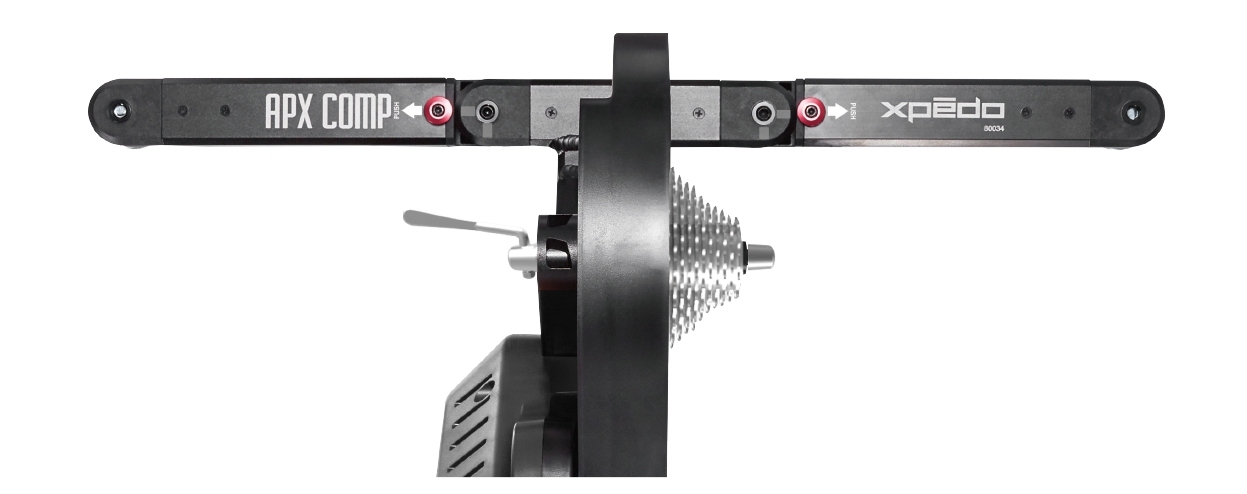
- Adjust the base support frame to fit the bicycle wheel size (24”, Adjust the base support frame to fit the bicycle wheel size (24”, 26” or 700C). First, loosen and remove the locking screw on the stand (as shown in the circle in figure 1) by turning it counterclockwise. Move the support frame to desired wheel size slot and tighten the locking screw clockwise to secure the support frame.
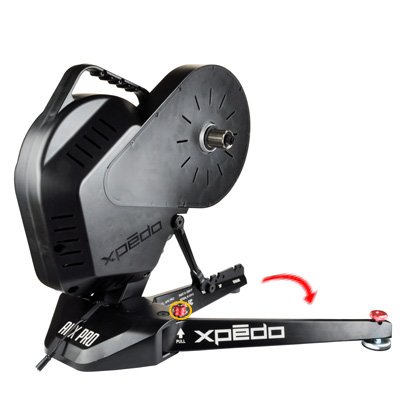
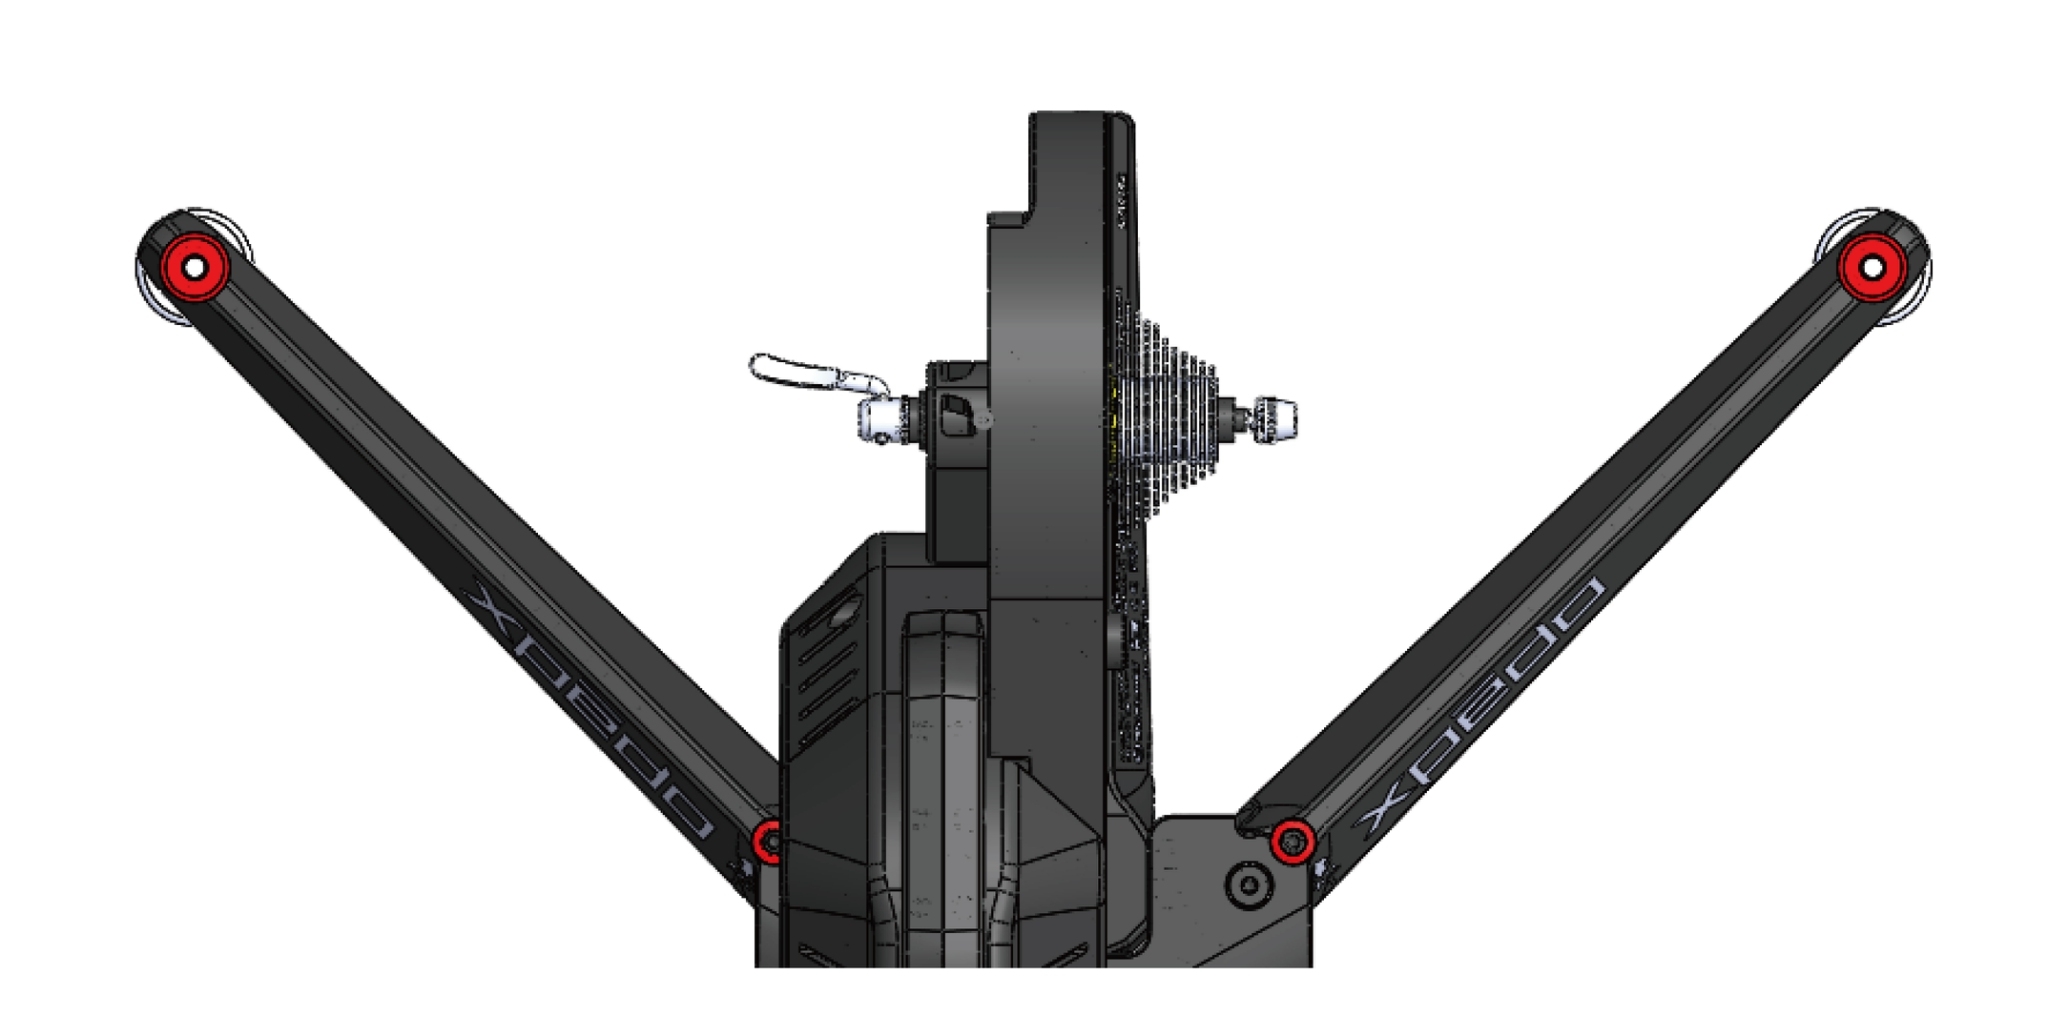
- Follow the arrow on the stand to pull up the red spring pin (as shown in the circle in figure 2 ), unfold the stand and pull the stand outward. When you hear a “click” sound, the stand is in position. Open both stands in sequence. Move the stand slightly to confirm it is secured.

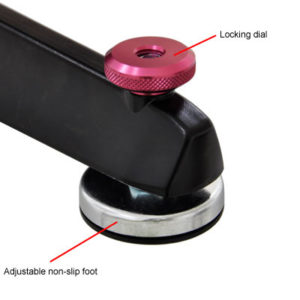
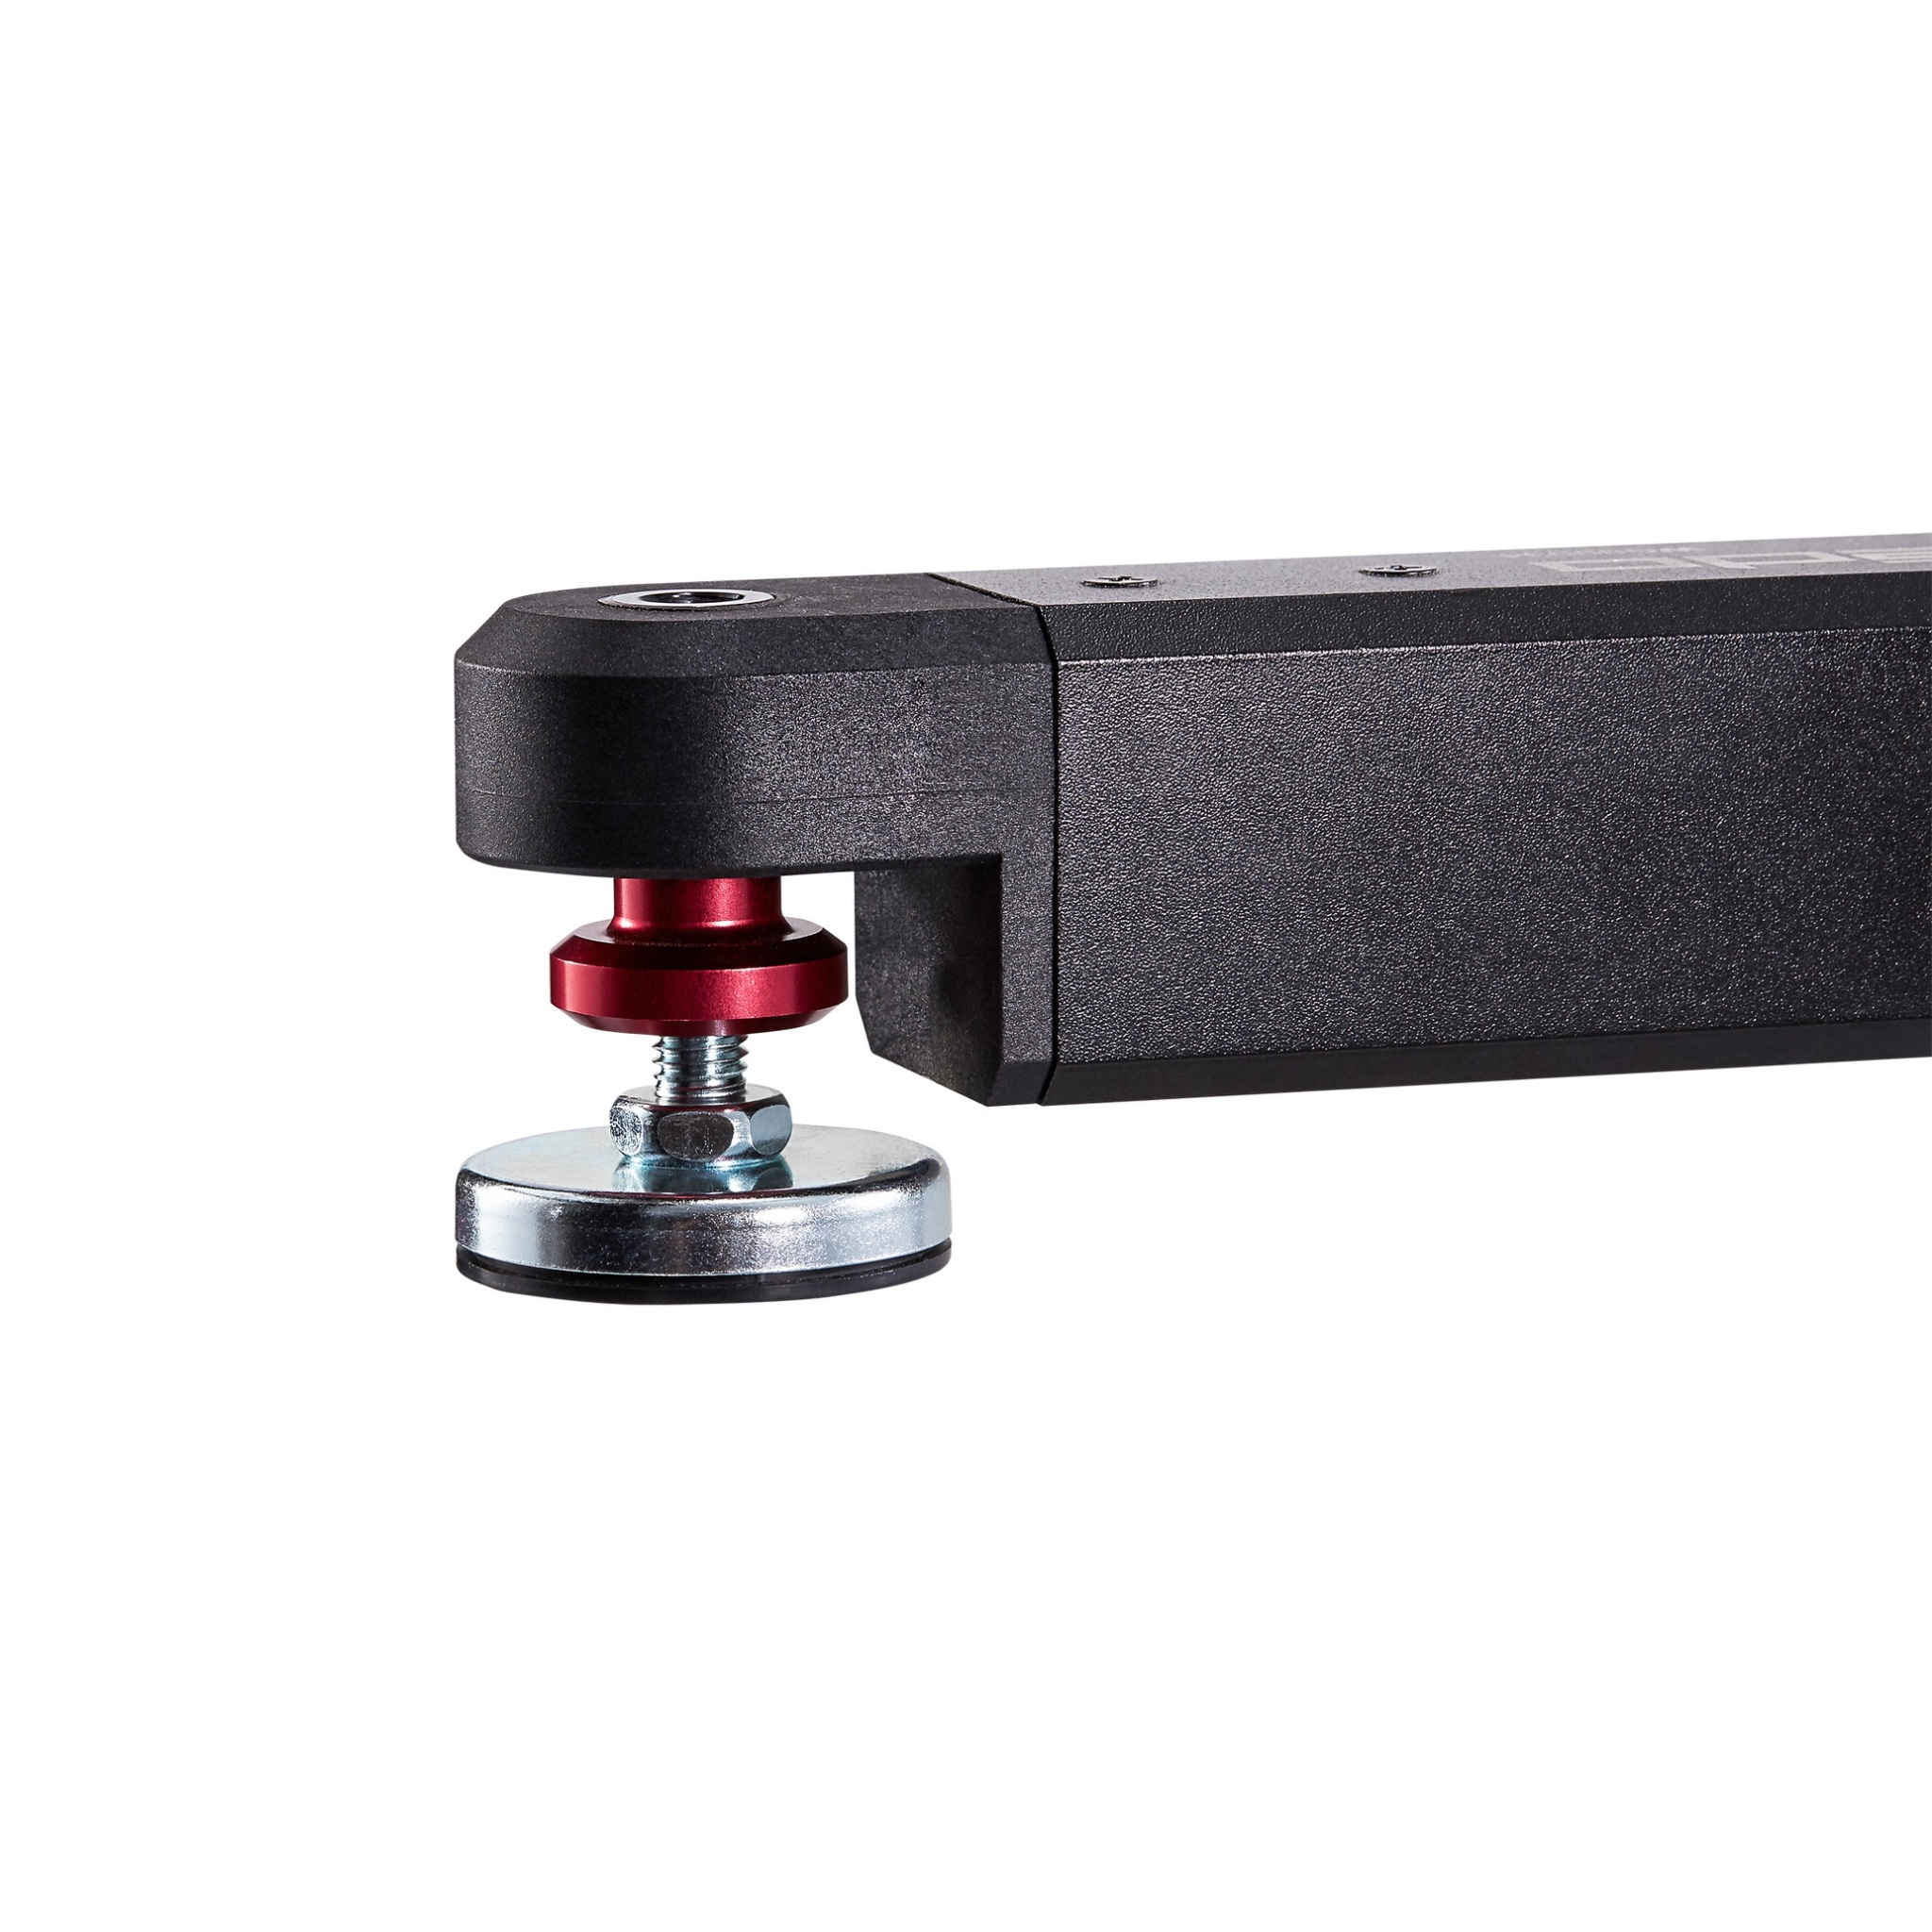
- Adjust the stand level according to the floor surface. The APX PRO Smart Trainer is equipped with two adjustable non-slip feet (silver color) at the end of the stand. First, rotate the upper red locking dial counter clockwise to loosen. Adjust the non-slip feet to the required height: rotate clockwise to extend and counter clockwise to shorten. Tighten the locking dials clockwise to secure the position.
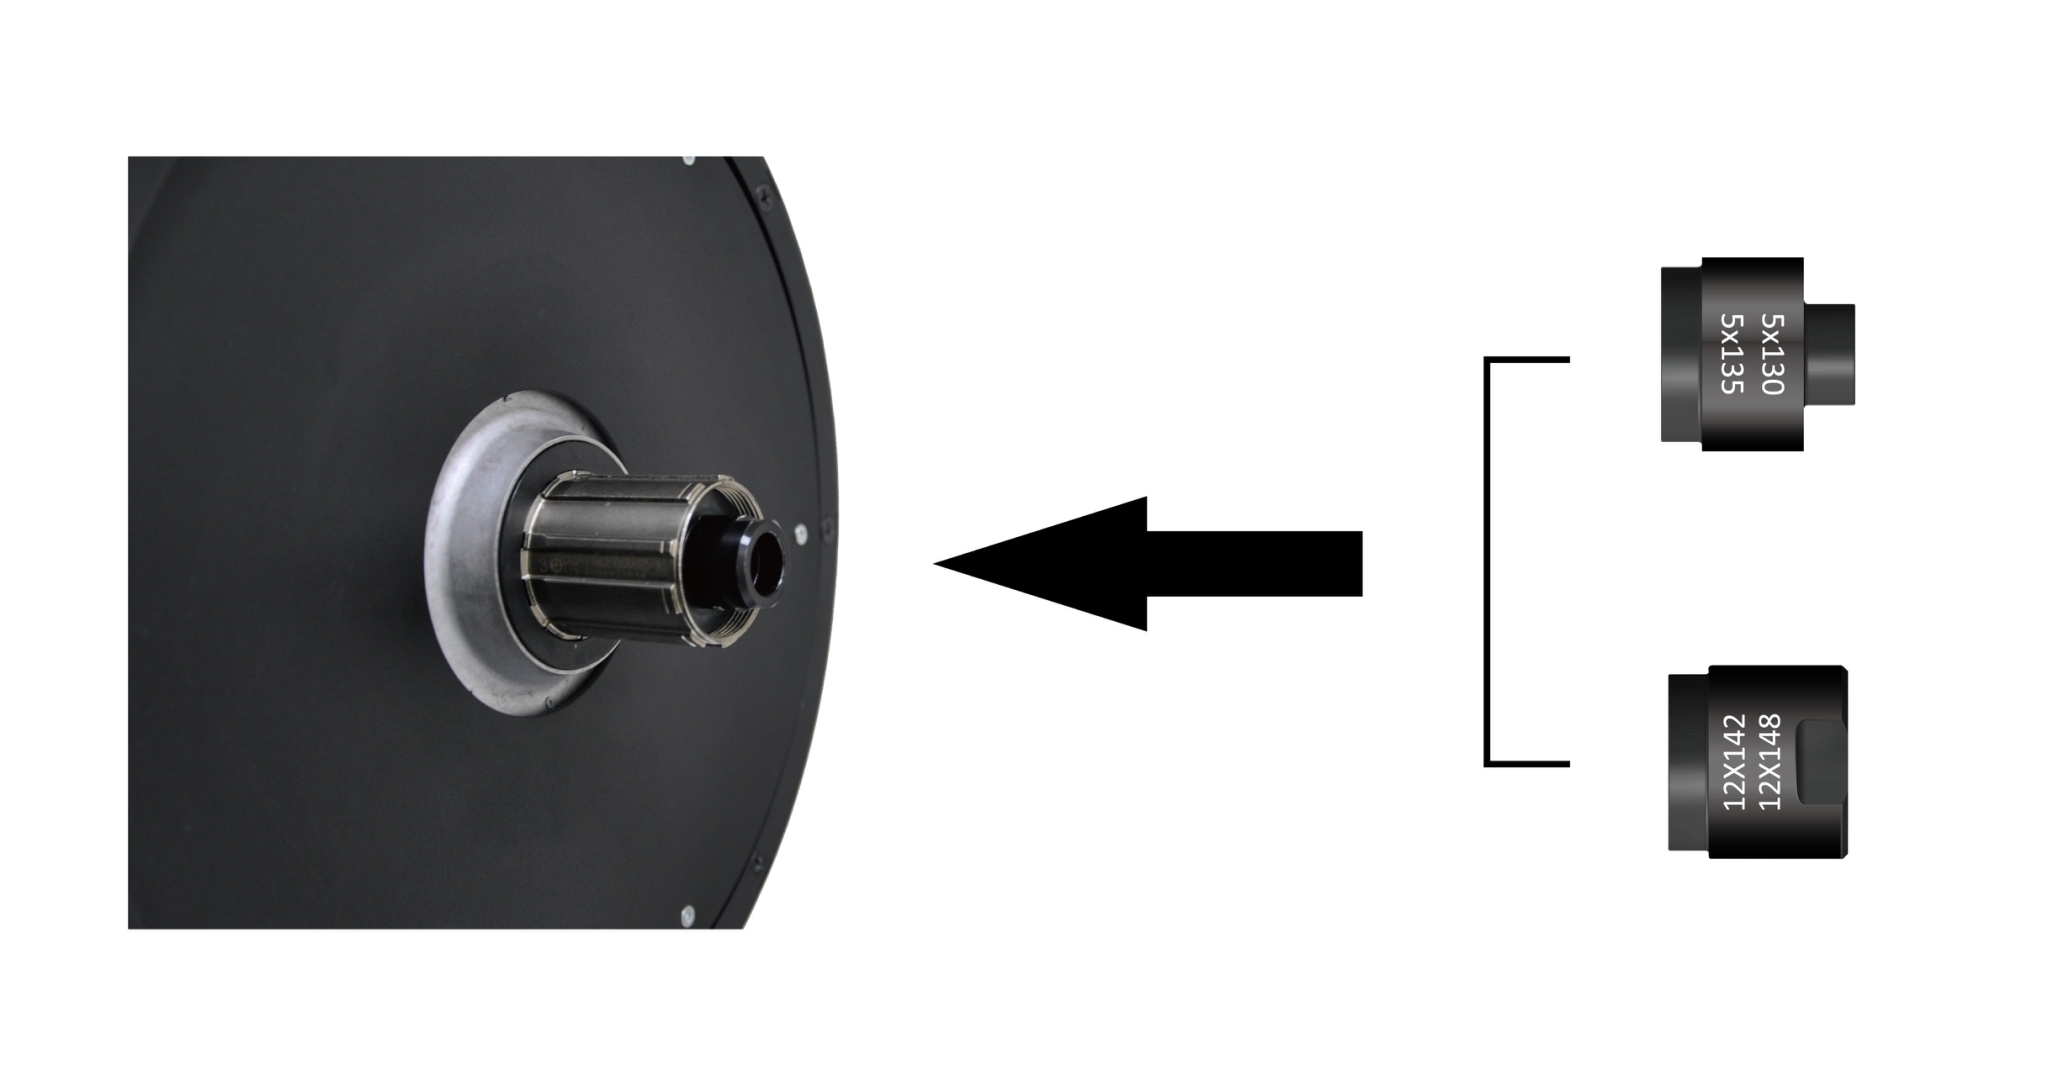
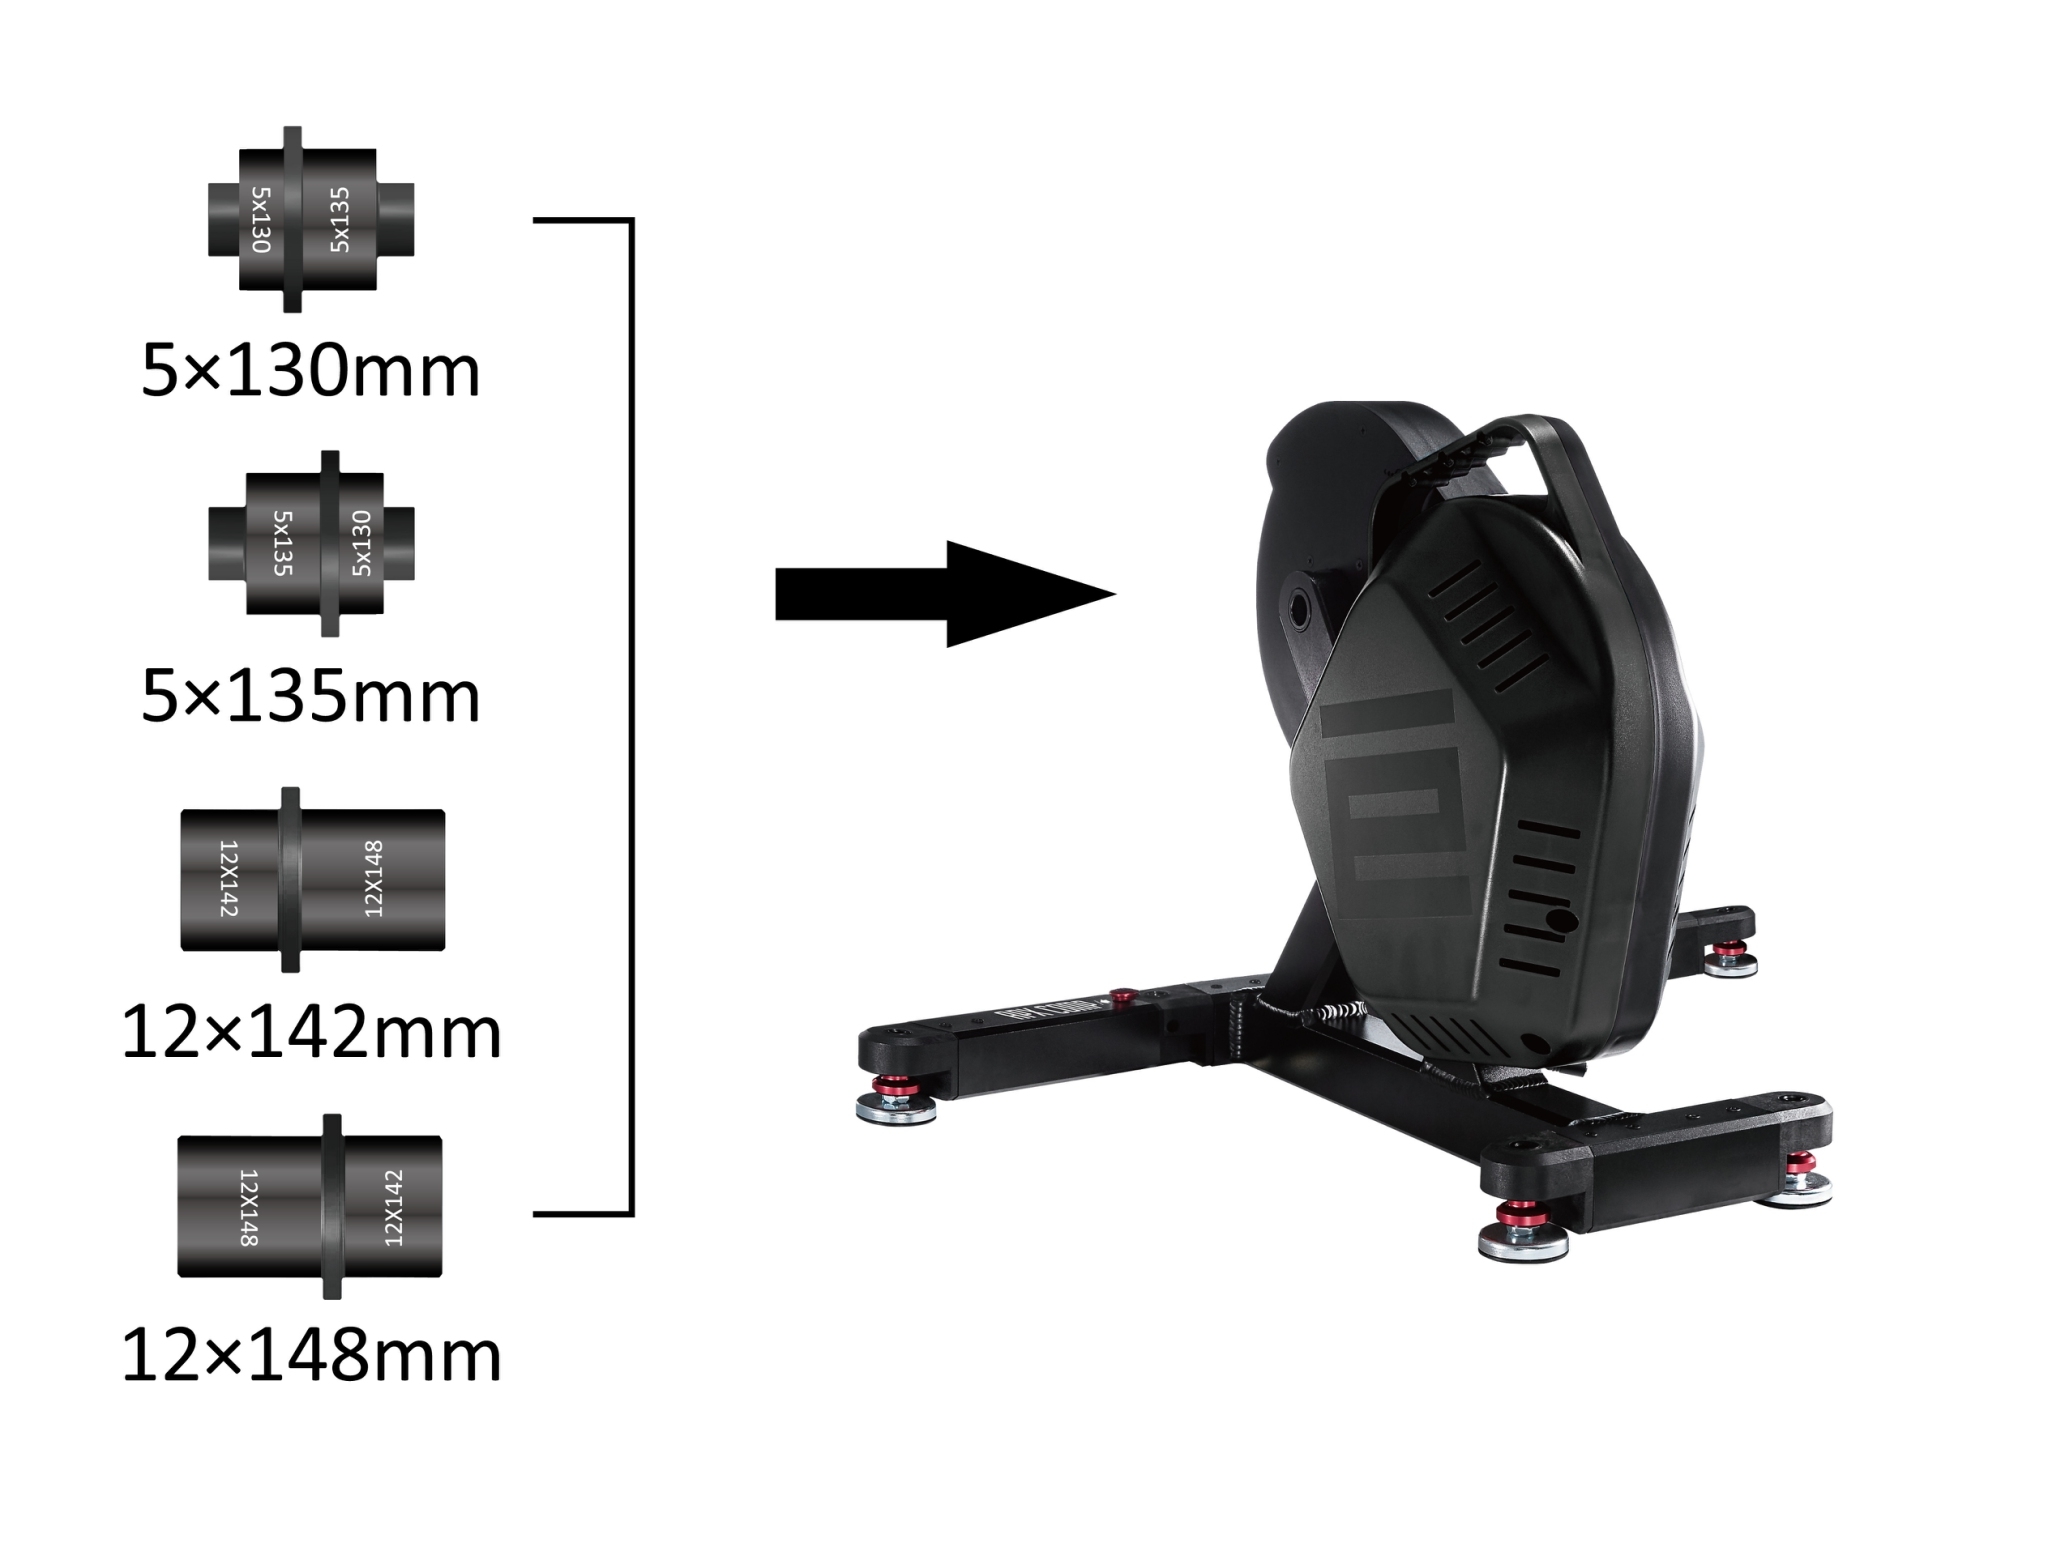
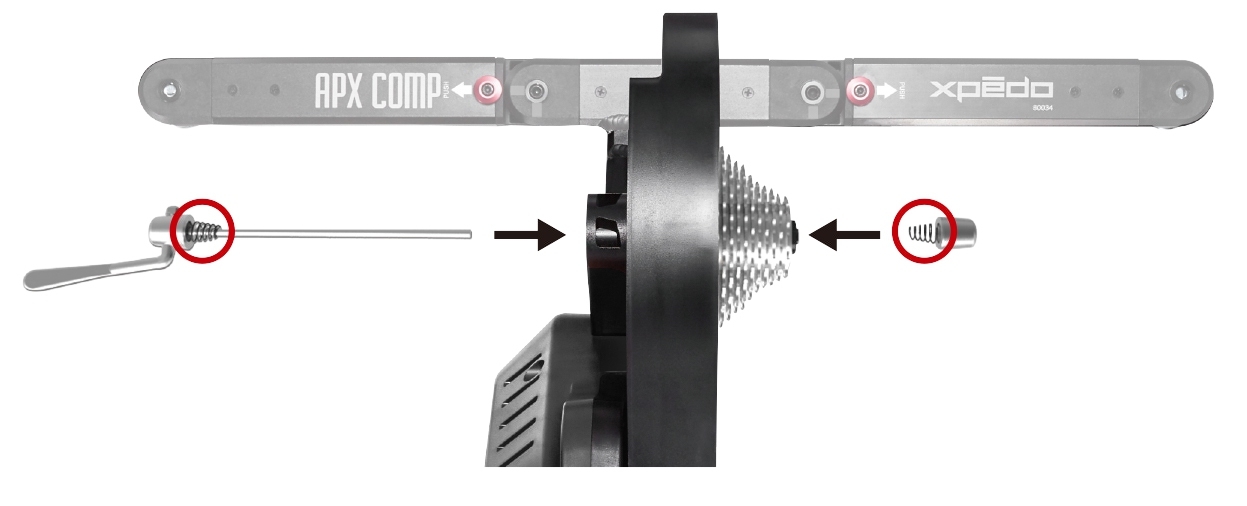
- Choose compatible freehub parts according to the bicycle type. The parts are engraved with corresponding specifications for identification. Carefully follow the installation direction to prevent any mishaps while using the APX PRO Smart Trainer.
- Install the frame conversion cap R of the corresponding type to the freehub body. The installation direction is shown below.If you are using a bicycle with 5×130/135mm, the frame conversion cap R (Item No. B) has been pre-installed on the freehub.If you are using a bicycle with 12×142mm or 12×148mm, please remove the 5×130/135mm axle end cap on the trainer first. Using a 5mm allen wrench and turn counterclockwise to take off the end cap. Select a compatible size end cap (Item No. D) to lock into the freehub by using 17mm open end wrench and turning clockwise until tight.

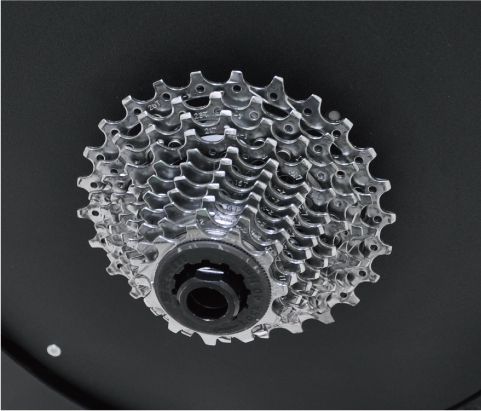
- Mount the cassette on the APX PRO Smart Trainer. Please install the cassette according to the manual. The APX PRO is equipped with a freehub body compatible with 9/10/11-speed cassettes by SHIMANO®/ SRAM®. Please place the spacer (Item No. F) before installing a 9/10-speed cassette. No spacer is required for a 11-speed cassette.(NOTE: Cassette is not included, please purchase it according to the corresponding specification)
- Mount the reversible axle spacer L of the corresponding type into the non-drive side of the freehub body. Use the Item No. A adaptor if the bicycle type is 5×130/135mm; use the Item No. C spacer if the bicycle type is 12×142/148mm. Follow the installation direction as shown below. Please pay attention to the installation direction when mounting the parts to prevent accidents. The corresponding specifications are engraved on the adapter sleeve with specification/size.
- Install quick release skewer of corresponding specification. 5mm quick release skewer is included (Item No. E).
- Remove acorn nut and single-sided spring at the end of the quick release skewer.
- Follow the direction as shown below to insert the quick release skewer into the reversible axle spacer L and the freehub body.
- Replace the spring at the end of the quick release skewer (the short side of the spring inward) and acorn nut. Keep the quick release lever open to mount the bicycle.
- Ensure the rear wheel type of the bicycle is equipped with the freehub configuration of the trainer.
- Adjust the bicycle shift position for assembly. It is recommended that the front chain positioned on the smallest sprocket; the rear chain positioned on the second or third sprocket (from small to large). Open the quick release lever from the rear wheel and remove.
- Install the bicycle on the APX PRO. Keep the front wheel direction of the bicycle steady with one hand; loosen the chain by pressing the rear derailleur cage with another hand to attach it on the second or third sprocket. Place the bicycle rear dropouts on the quick release skewer of the trainer; ensure the dropout is aligned with the axle; firmly press the bicycle frame to set the bicycle. The front wheel can be lifted slightly from the ground to confirm the frame has been completely fixed to the APX PRO.
- Tighten the quick release skewer. Lock the quick release acorn nut with the appropriate force and clamp the quick release lever shut. Loosen the acorn nut first if the quick release lever cannot be pressed.
- Test run. Please run the chain by turning the crank slightly to test the operation after installation. Reinstall the bicycle if unexpected abnormal sound occurs during the operation.
CAUTION:
- Please consult the nearest dealer or check the bicycle instruction if you are not familiar with the correct procedure for removing the rear wheel.
- Failure to properly mount the bicycle and the trainer may result in serious injury, please ensure the trainer and bicycle have been properly installed before use.
- Incorrect assembly method may damage the frame paint when mounting the bicycle on the trainer. We recommended protecting the bicycle frame from the damage during assembly.
Trainer Setup - APX COMP
Confirm bicycle specification and the type of rear wheel hub and width before using the trainer.
- Place the APX COMP Smart Trainer on the stable solid ground.
- Follow the direction indicated by the arrow on figure 1. First, push the red pin (see the circle) on one stand to release the switch and unfold the stand.
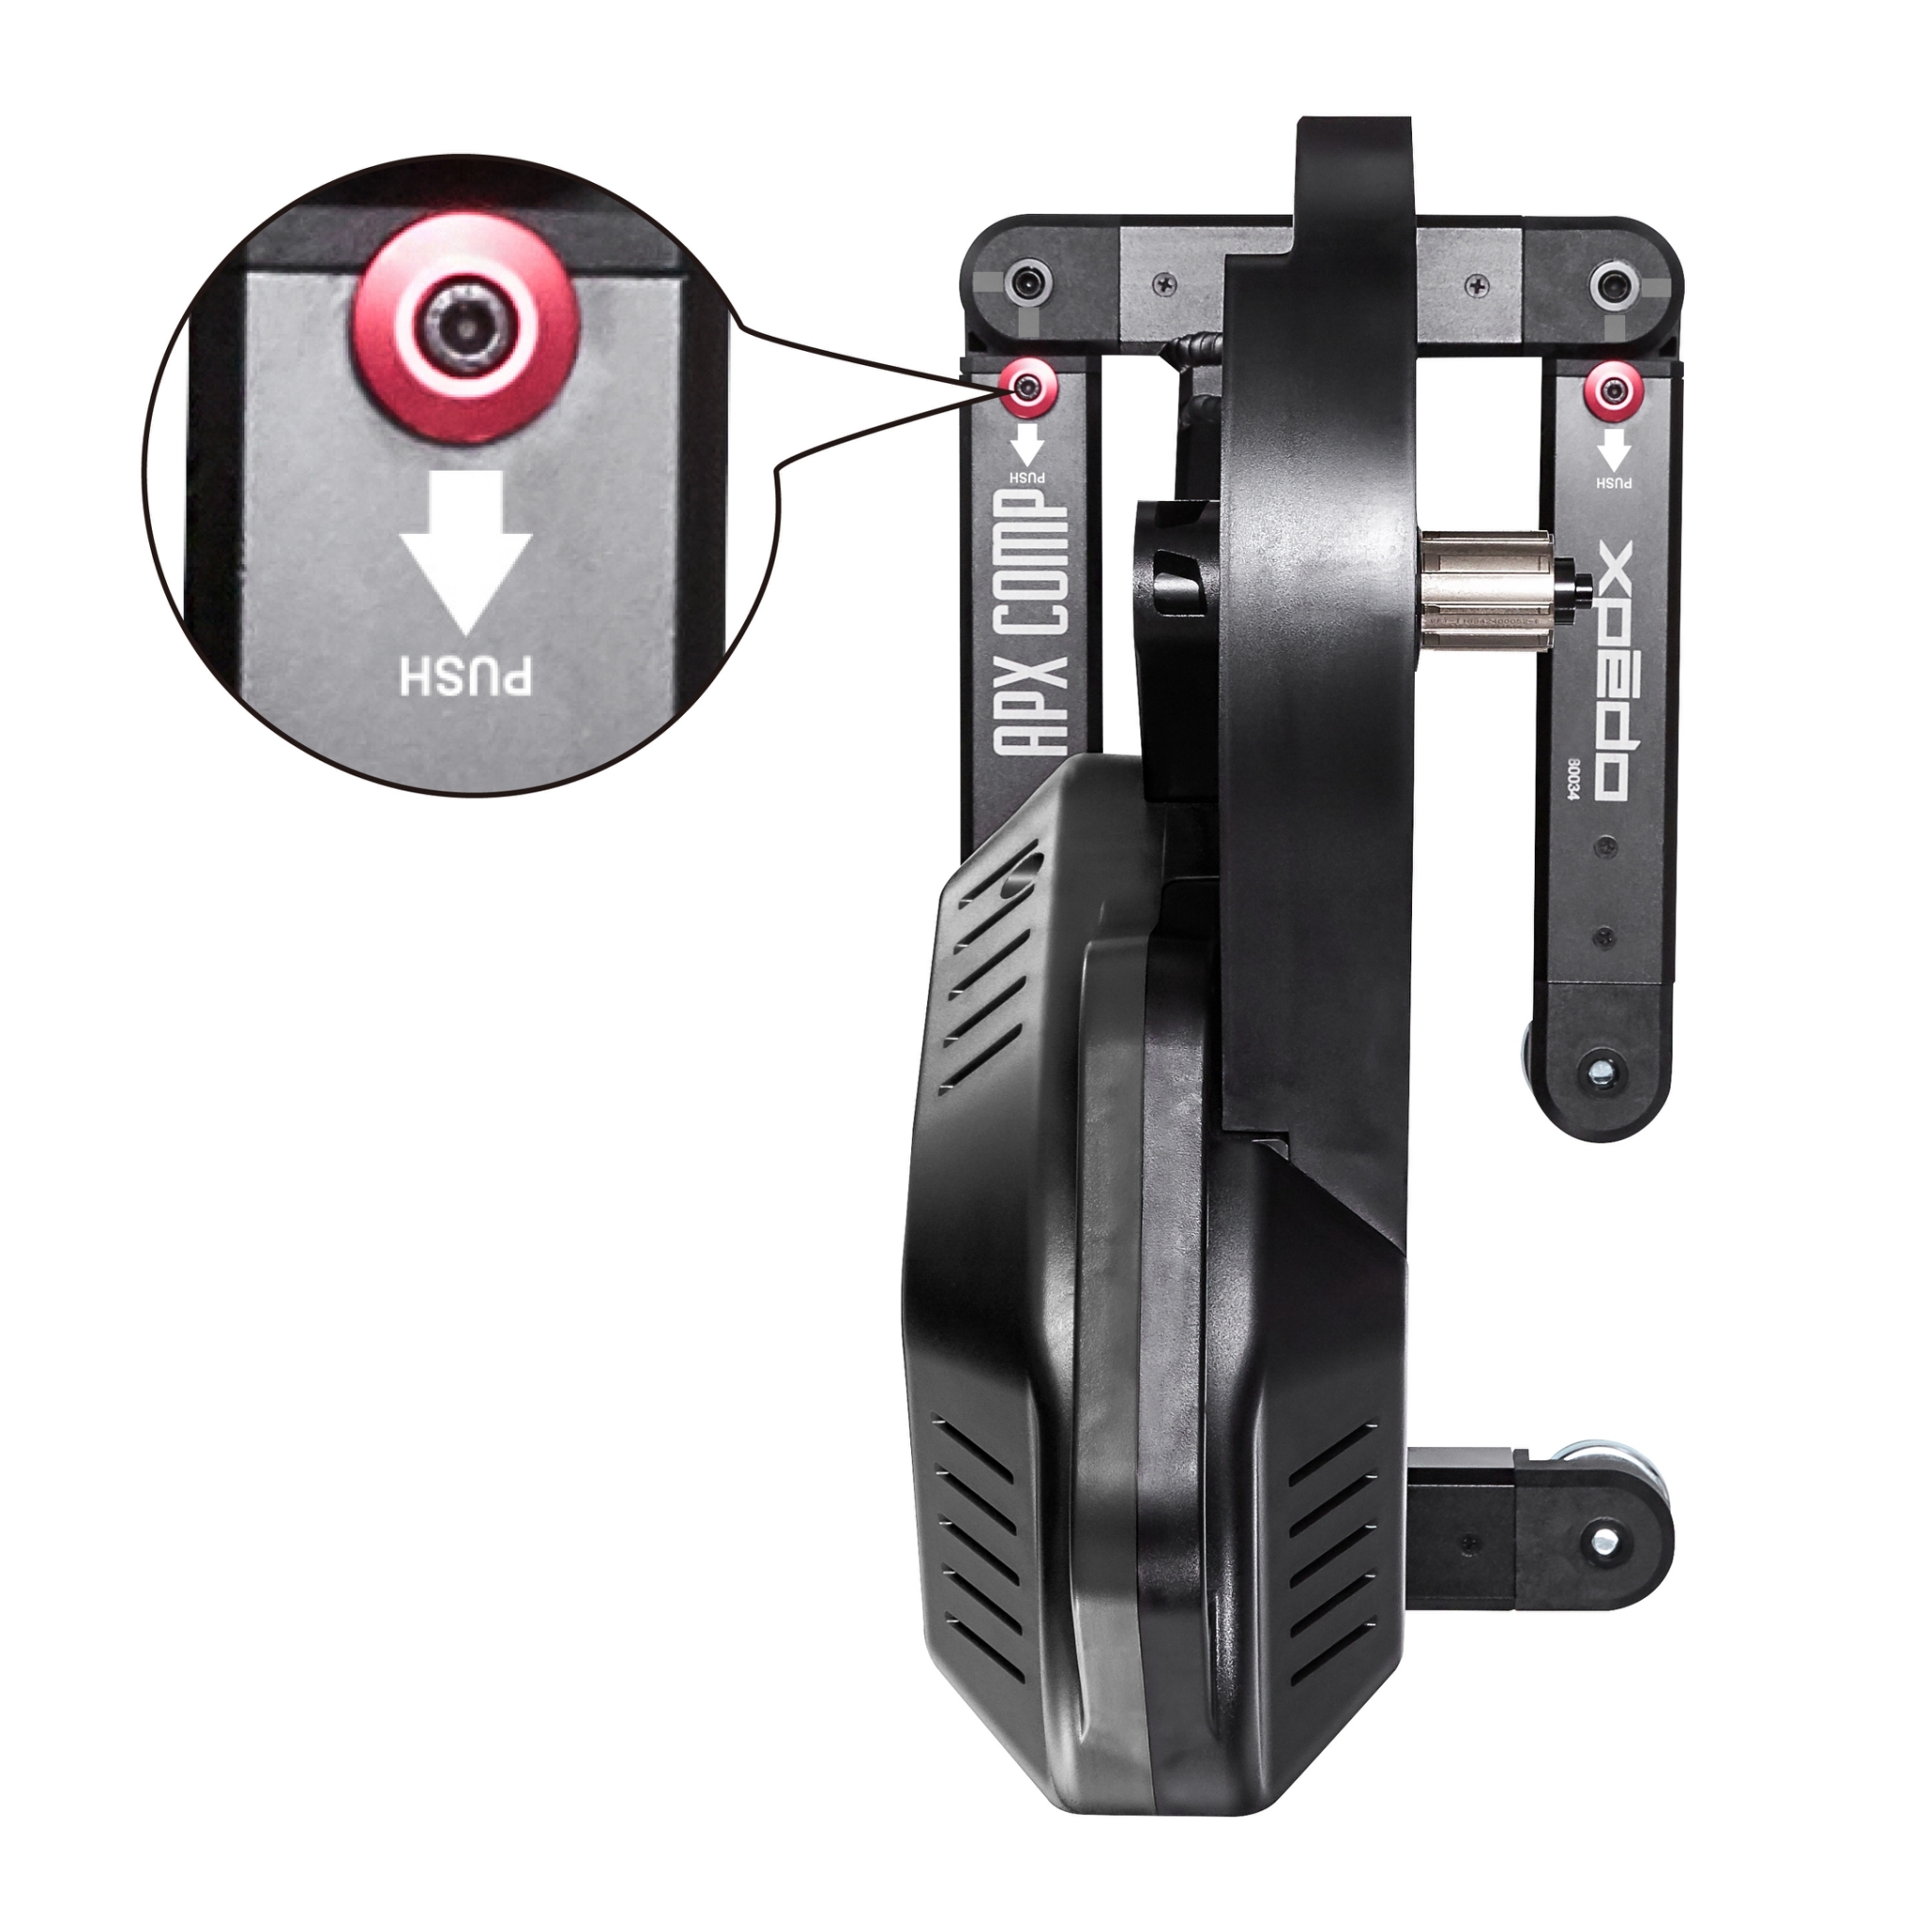
- Open both stands in sequence. A “click” sound and bounced-back spring pin indicate the stand has been put into the position. Move the stand slightly to confirm it is secured.
- Adjust the stand level according to the floor surface. The APX COMP Smart Trainer is equipped with four adjustable non-slip feet (silver color) at the end of the stand; turn clockwise to extend and counterclockwise to shorten. Please adjust them accordingly to the height of the ground. Loosen the upper red fixing screw first and tighten it counterclockwise to secure the position after adjusting the non-slip feet to the required height.
- Choose compatible freehub parts according to the bicycle type. Carefully follow the installation direction to prevent any mishaps while using the APX COMP Smart Trainer.
- Install the frame conversion cap R of the corresponding type to the freehub body. The installation direction is shown below.If you are using a bicycle with 5×130/135mm, the frame conversion cap R (Item No. B) has been pre-installed on the freehub.If you are using a bicycle with 12×142mm or 12×148mm, please remove the 5×130/135mm axle end cap on the trainer first. Using a 5mm allen wrench and turn counterclockwise to take off the end cap. Select a compatible size end cap (Item No. D) to lock into the freehub by using 17mm open end wrench and turning clockwise until tight.
- Mount the cassette on the APX COMP Smart Trainer. Please install the cassette according to the manual. The APX COMP is equipped with a freehub body compatible with 9/10/11-speed cassettes by SHIMANO®/ SRAM®. Please place the spacer (Item No. F) before installing a 9/10-speed cassette. No spacer is required for a 11-speed cassette.(NOTE: Cassette is not included, please purchase it according to the corresponding specification)
- Mount the reversible axle spacer L of the corresponding type into the non-drive side of the freehub body. Use the Item No. A adaptor if the bicycle type is 5×130/135mm; use the Item No. C spacer if the bicycle type is 12×142/148 mm. Follow the installation direction as shown below. Please pay attention to the installation direction when mounting the parts to prevent accidents. The corresponding specifications are engraved on the adapter sleeve with specification/size.
- Install quick release skewer of corresponding specification. 5mm quick release skewer is included (Item No. E).Remove acorn nut and single-sided spring at the end of the quick release skewer.Follow the direction as shown below to insert the quick release skewer into the reversible axle spacer L and the freehub body.Replace the spring at the end of the quick release skewer (the short side of the spring inward) and acorn nut. Keep the quick release lever open to mount the bicycle.
- Ensure the rear wheel type of the bicycle is equipped with the freehub configuration of the trainer.
- Adjust the bicycle shift position for assembly. It is recommended that the front chain positioned on the smallest sprocket; the rear chain positioned on the second or third sprocket (from small to large). Open the quick release lever from the rear wheel and remove.
- Install the bicycle on the APX COMP. Keep the front wheel direction of the bicycle steady with one hand; loosen the chain by pressing the rear derailleur cage with another hand to attach it on the second or third sprocket. Place the bicycle rear dropouts on the quick release skewer of the trainer; ensure the dropout is aligned with the axle; firmly press the bicycle frame to set the bicycle. The front wheel can be lifted slightly from the ground to confirm the frame has been completely fixed to the APX COMP.
- Tighten the quick release skewer. Lock the quick release acorn nut with the appropriate force and clamp the quick release lever shut. Loosen the acorn nut first if the quick release lever cannot be pressed.
- Test run. Please run the chain by turning the crank slightly to test the operation after installation. Reinstall the bicycle if unexpected abnormal sound occurs during the operation.
CAUTION:
- Please consult the nearest dealer or check the bicycle instruction if you are not familiar with the correct procedure for removing the rear wheel.
- Failure to properly mount the bicycle and the trainer may result in serious injury, please ensure the trainer and bicycle have been properly installed before use.
- Incorrect assembly method may damage the frame paint when mounting the bicycle on the trainer. We recommended protecting the bicycle frame from the damage during assembly.
Trouble Shooting
- Check if the trainer is conneted to the power supply and the LEDs on it should be lit. (blue & green LEDs blinking)
- Check the wireless connection, the ANT+ USB dongle shall be connected to your computer or tablet.
If you are using Bluetooth connection, please make sure Bluetooth function is turned on.
Do not connect via device Bluetooth with your Xpedo Smart Trainer. Do turn on the location in your phone and connect via app with your XPEDO Smart Trainer.
- Check if your trainer has been paired with another device or training application.
- If the issue still cannot be resolved, please contact us or the nearest dealer for assistance. 。
- Check if the bicycle has been properly installed according to the manual.
- Ensure the flywheel is fully tightened before use if it has been removed or reinstalled.
- If the issue still cannot be resolved, please contact us or the nearest dealer for assistance.
- Check if the bicycle has been mounted correctly. It is recommended that you reinstall the bicycle by following the “Step 4” in accordance with the manual.
- If the abnormal sound cannot be ruled out, please contact us or the nearest dealer for assistance.
- Please rotate the stand slightly and push the leg again when rotating.
- If the leg is still unable to push, please do not force to push it for prevention personal danger or product failure.
- If legs on the trainer still cannot run smoothly, please contact us or the nearest dealer for assistance.
- To update the firmware of the trainer, you need to use WhiizU pairing to connect to the XPEDO trainer
- Once your trainer is paired and connected to the WhiizU app, click on the trainer icon to find out the current firmware version of the trainer
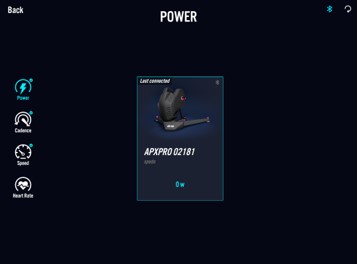
- If the update option is not displayed, it means the firmware is already the latest version
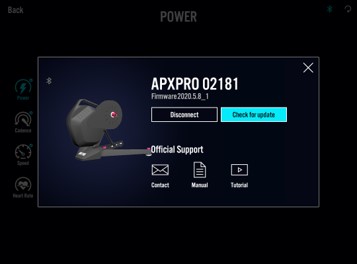
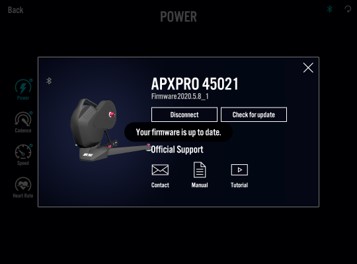
- If a newer version is available for update, the system will inform you that there is a new version for you to update.
Click the update button to start the firmware update process. - Refer to the above steps if you can’t update or any other technical issues,
Please contact us.
| APP | iOS | Android | PC |
| WhiizU
|
Requires iOS 10.0 or higher, Compatible with iPhone, iPad (2 GB or more RAM, iPhone 6s or higher) | Requires Android 10.0 or higher, with Snapdragon™ 62 processor or higher, 3 GB RAM at least. | Requires Windows 7 or higher, with Intel Core 2 Duo processor or higher, 4 GB RAM at least. |
| Zwift | Requires iOS 11.0 and watchOS 3.0 or later. Compatible with iPhone, iPad, and iPod touch. | Requires Android 7.0 or higher. | Windows 7 (64bit) or higher, or macOS 10.10 or higher. You’ll want at least an Intel Core 2 Duo processor and 4GB of memory. |
| Kinomap
|
Requires iOS 9.0 and watchOS 5.0 or later. Compatible with iPhone, iPad, and iPod touch. | Requires Android 5.0 or higher. | No
|
| Rouvy AR
|
Requires iOS 11.0 or later. Compatible with iPhone, iPad, and iPod touch. Apple TV. | Requires Android 5.0 or higher.
|
CPU 2.33Ghz or faster x86-compatible processor or interl Atom 1.6Ghz or faster processor for notebook class devices
OS Windows 10 1 GB of RAM (4GB recommended) |
| RGT Cycling Mobile
|
Requires iOS 11.0 or later. Compatible with iPhone, iPad, and iPod touch. | Requires Android 7.0 or higher. | No
|
| RGT Screen | Requires iOS 11.0 or later. Compatible with iPad. Apple TV. | Requires Android 7.0 or higher. | OS Windows 10 version 17763.0 or higher. Architecture x64
DirectX Version 10 Memory 2 GB Video Memory 1 GB Processor 64 bit core i5 or better Graphics Geforce serie 9 or better |
| FULGAZ | Requires iOS 11.0 or later. Compatible with iPhone, iPad, and iPod touch. Apple TV. | Requires Android 7.0 or higher. | OS Windows 10 version 17763.0 or higher, Windows 10 version 17763.0 or higher, Xbox One
Architecture x64 |
| BKOOL | iOS 10.3.4 or later. | Android 5.0 or higher. | Windows 8.1 Processor
Intel Core 2 Quad CPU Q6600 @ 2.40GHz (4 CPUs) / AMD Phenom 9850 Quad-Core Processor (4 CPUs) @ 2.5GHz RAM:4GB Graphics: Intel HD or equivalent Hard Disk: 2GB Internet: 20Mbps |
| The Sufferfest | Requires iOS 12.2 or later. Compatible with iPhone, iPad, and iPod touch. | No | Windows 8.1 or Higher
Intel Core2 Duo or 1.3GHZ processor 2GB of Memory |
| Xert | Requires iOS 9.3 or later. Compatible with iPhone, iPad and iPod touch. | Android 4.4 or higher | No |